How to grow a Calathea in Leca
Calatheas are notoriously tough plants to keep alive, because they require a lot of humidity, a level that's quite difficult to achieve if you live in a colder climate. But there is some light at the end of the tunnel: Leca.

Leca, Lightweight Expanded Clay Aggregate, helps to keep the immediate environment of your plant humid, because air can very easily travel between the clay balls and absorb moisture as it does this. This helps to keep the immediate surroundings of your Calathea more humid than soil would be able to. There are also other ways of raising the humidity, but for this guide we're going to focus on Leca and how to grow your Calathea in it.
Any good guide has a few simple steps to help you through this process, so these are the ones we're going to go through:
- Remove your Calathea from its soil
- Clean the soil off the roots of your Calathea
- Plant your Calathea in Leca
- Take care of your Calathea in Leca
The steps are slightly different from the other guides we've written about converting your plants from soil to Leca. They're different because the Calathea is a humidity-loving plant and is quite a thirsty plant. Our other guides are primarily aimed at plants that shouldn't be watered a lot in general. So if you have another plant, like a Spider plant, that's quite thirsty, you can use the tips in this guide for that plant as well.
1. Remove your Calathea from its soil

When you've (carefully) removed your plant from its pot, you can start to remove the large chunks of soil from the roots and move onto the next step.
2. Clean the soil off the roots of your Calathea
We've gotten the Calathea out of the pot and now we're going to remove (most of) the soil from the roots of the plant. The Calathea roots are quite tough and there are usually a lot of them. The most important part of this process is to take your time. At some point, you'll have removed all of soil you can reach with your hands. Once you've reached that stage, we'll move on to cleaning the roots with lukewarm water. Remember, the Calathea is very easy to stress out, so don't use hot or cold water. Make sure the water is at room temperature before you put the roots of your Calathea in the water to clean them.
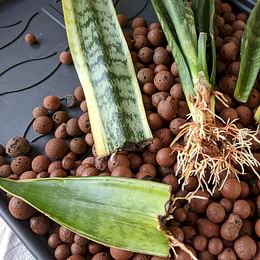
Using water, it'll be much easier to clean the roots, but don't worry about cleaning the roots perfectly. Over time, we'll be able to clean the roots more and more. When the roots look a little like the image below, you're ready to plant your Calathea in Leca.

Don't be scared of the very dry looking leaves. These dry leaves were the whole reason for us to migrate this plant from soil to Leca. They will slowly die over time and you'll get beautiful new leaves in return.
3. Plant your Calathea in Leca
We've cleaned the soil off the roots of our Calathea and now we're ready to plant it in Leca. As we mentioned before, the Calathea is a humidity-loving plant and is also quite thirsty. This means that we won't need to create a base layer of Leca for this plant.
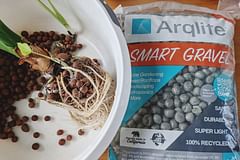
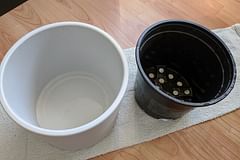
Before we can plant your Calathea in Leca, you'll need to clean your pots and clean your leca. These two steps make sure that we're working with clean Leca and that there is no soil left in the pots that we're going to use. If there is soil left in the pots, it could cause problems (fungi, etc.) later on, so it's best to avoid this altogether.
When you've cleaned your pots and your Leca, we can start to plant our Calathea in Leca. Since we don't need a base layer of Leca for a Calathea, you can put your plant in the nursery pot right away and start to cover the roots with the clay balls. Continue adding Leca until you're just under the edge of your pot.

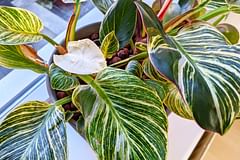
The Calathea roots might still stick out a little like in the image above, but that's okay. As long as most of the roots are covered, this shouldn't be a problem. We recommend staying just under the edge of your pot, because as the plant grows, it'll start to push Leca up. It's a mess trying to find your clay balls if they fall out.
4. Take care of your Calathea in Leca

As we're using Leca, you'll need to add hydroponics fertilizer to your water every time. There is a link below this post with a link to some great hydroponics fertilizer you could use with this. If you do this every time, you'll see a lot of growth during the growing period of your Calathea. This will make up for all the lost leaves and as an added bonus, these leaves will remain well hydrated, without too many dry leaves. This is where you can see the water regulation properties of the Leca shine. If you want to know more about watering your Calathea in Leca, you can look at How to water a plant in Leca.
A note about a stressed Calathea
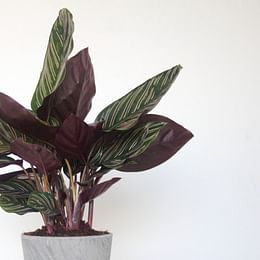
Now comes the toughest part of this process. We mentioned earlier on that the Calathea is very easy to stress out. If you happened to stress out your Calathea during this process and it's currently the dormancy period of the Calathea (autumn/fall or winter) you could experience major leaf loss on your Calathea. Stressing out a Calathea is very easy, so don't feel bad if this happened to you, it also happened to us. In the beginning of the post, we showed you a photo of the Calathea in soil and also after cleaning its roots. It still had a lot of leaves. After converting the Calathea to Leca in the winter, we lost all but 2 leaves on the Calathea. This is a very scary thought, but it's not something to stress about too much. As soon as the growing period (spring and summer) arrives, the plant will start to grow leaves very quickly and the leaves won't look as dry as the photo earlier. This is something to remember. Your plant will recover and it'll come back more beautiful and healthy than before.
Thank you for reading this post! I hope it helps you to keep your plants healthy and beautiful! If you're looking for more guides on specific plants, you can always request a plant guide to get a guide for the plant you have trouble with.
Test your plant care knowledge
Quiz completed!
Want to learn more? Sign up for my newsletter to receive free tips in your inbox!
Sign up now!