How to grow a Begonia Maculata in Leca
A Begonia Maculata looks like a difficult plant to take care of. However, the it's an easy-going plant that's perfect for beginners. In this post, we'll go over how you convert a Begonia Maculata from soil to Leca.

We've already published a guide about How to care for a Begonia Maculata (polka dot plant), in which we explain how to care for your plant when you're planting it in soil. However, what if you want to go a step further and grow your Begonia in Leca? Well, in that case, this guide is for you!
When you grow your Begona in Leca, you won't have to worry about watering your plant as much anymore, so it becomes an even more "hands-off" kind of plant.
In this guide, we'll cover these topics:
- Pull your Begonia Maculata out of the pot
- Clean soil off roots by hand
- Clean soil off roots with water
- Prepare your pots
- Prepare your Leca
- Plant your Begonia Maculata in Leca
- Water your Begonia in Leca
- Maintain your Begonia in Leca
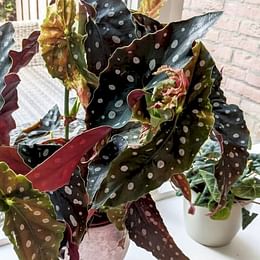
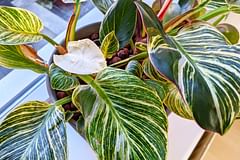
Before we get started, let's remind ourselves what the plant looks like before converting it from soil to Leca.

It's always a great idea to get a before and after picture because that way you can see what you've learned along the way. Now that we know what it looks like before converting the plant to Leca, let's get started.
1. Pull your Begonia Maculata out of the pot

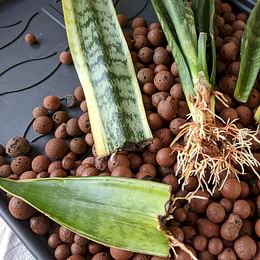
Before we can plant the Begonia in Leca, we'll need to prepare it for this process. Let's start by pulling the Begonia out of the pot, so we can have a look at the roots and be able to start cleaning the soil off the roots in the next step. As you can see in the photo above, this Begonia already has a lot of roots.
At this point, you can still decide not to continue converting your plant to Leca and to keep it in the soil. Depending on how many roots your Begonia has, it could take a long time to clean the soil off your plants, because the roots are very thin and are easily damaged. So make sure you have plenty of time to use for this whole process and make sure not to rush anything.
2. Clean soil off roots by hand

Now that the plant is out of the pot, we're going to clean the soil off the roots. In the beginning this is quite easy, but remember to be careful and not damage the roots too much. Don't worry about cleaning the roots off perfectly at this stage, that's just not possible with your hands. The goal is to get as much soil off with your hands.
In the next step we'll clean the tough-to-reach soil using water, so in this stage we're only interested in cleaning the largest portion of the soil off. Remember to take your time and be as gentle as you can with the roots. These roots are very thin and are easily damaged.
3. Clean soil off roots with water

Now that we've cleaned off the largest parts of soil using our hands, we can get to the tough-to-reach places using water. Be sure to use water at room temperature to not expose the roots to water that's too warm or too cold. When we use room temperature water, we're making sure the plant gets stressed less.
You don't have to clean them until the roots are 100% clean. Just take your time and be very gentle while cleaning the roots with water. When most of the soil has been cleaned off, like in the photo below, you're ready to continue to the next step.

The roots are now mostly clean, so we're ready to move onto preparing the pots and the Leca.
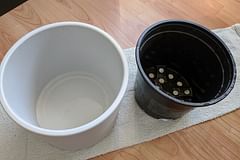
4. Prepare your pots

Now that our plant is (mostly) soil free, it's time to prepare the pots for use with Leca. We'll need an outer pot that can hold water without leaking and an inner pot with holes in the bottom. The inner pot will contain the Leca. The reason we're using an inner pot is so we can easily check if we need to water the plant or if there is too much water in the pot.
To prepare both pots for use with Leca, we'll need to wash them with a sponge and dish soap. After that's cone, you can dry them off or let them dry while you move on to the next step: Preparing the Leca.
If you'd like to know more about this step, check out "How to clean your pots for use with Leca".
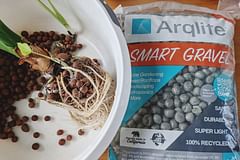
5. Prepare your Leca

Your plant is ready, your pots are ready, now the last part that you need to prepare is the Leca itself. If you've used and cleaned the Leca you're going to use before, you can skip this step and move on to planting your Begonia in Leca. If you've never used the Leca before and it's new and in the bag, you'll need to clean it. The clay balls have a lot of dust on them and we need to wash this off using water.
To estimate how much you're going to need, you could get the inner pot and fill it with Leca up until about 2 inches from the top. If you're unsure if you have the right amount, you can always fill a similarly sized pot up to the top with Leca and use that amount. You will have leftover Leca, but you can use this for another project. If you do have leftovers, don't put it back with the rest of your unwashed Leca, unless you don't mind washing them again in the future.
Now that you know how much Leca you're going to need, you can put it in a bucket and add water to it. Start to wash the Leca and refresh the water every once in a while. It usually takes about 5 refreshes for the Leca to be clean enough for use with your Begonia Maculata. When your Leca is clean enough, you can go to the next step and plant your Begonia in Leca.
If you'd like to know more about this step, check out "How to prepare Leca for first use".
6. Plant your Begonia Maculata in Leca
You've made it to a very exciting stage of this process! You can finally plant your Begonia Maculata in Leca. Depending on the size of your inner pot, you should add a base layer of Leca of about an inch like the photo below.

This base layer serves as a protective layer for your plant. This base layer helps to make it less likely that the plant's roots sit in water. It lifts the roots off the bottom, where the water is and allows the Leca to soak up the water instead.
After this base layer you can add your plant(s) in the pot and arrange it however you like. Once you've got a nice arrangement for your Begonia(s), you can slowly add more Leca in the pot. You will have to hold your plants in place until you've covered all the roots, because they tend to fall over. Once you've covered the roots, it's usually stable enough to stop holding them into place. At this point you can keep adding Leca until a little under the top of the pot. It's okay if you add Leca up to the top as well, because unlike soil, water won't drop off to the sides and will go straight down towards the roots.
7. Water your Begonia in Leca
Amazing! You've just planted your Begonia in Leca! Now we can water our Begonia for the first time. Remember to add hydroponics fertilizer to your water every time you water your Begonia. The Leca doesn't contain any nutrients by itself, so you'll need to add it to the water. Follow the instructions for the product you have, because this ensures you don't add too much or too little fertilizer. Too much fertilizer could result in acidic water, which will kill your plant. Too little fertilizer and your plant won't have enough energy to keep growing.
Once you've got the right amount of hydroponics fertilizer in the water, you can add water to the outer pot. Remember the base layer we created in the previous step? Make sure to stay under that level, so your plant never sits directly in the water at the bottom of the pot. This could take a little trial and error. If you're unsure about this, make sure you add just enough water so that the bottom layer of Leca is able to soak up the water in the pot. The Leca will get the moisture to your plant.
If you'd like more information on watering your plant in Leca, you can find out more by reading "How to water a plant in Leca".
8. Maintain your Begonia in Leca
So where do you go from here? Of course, at some point you'll have to water your plant again. But there is one more thing you'll need to do for the first few weeks: Cleaning the Leca and the roots. This seems a little strange, because you've already done these steps earlier on in this guide. This time you're going to carefully clean more of the soil off. Both from the roots and the clay balls.
The soil will slowly let go of the roots as your plant is growing in Leca, but it could take a little while. So for the first few weeks you'll need to carefully rinse the clay balls and roots to remove the excess soil. Don't worry about removing everything, do a little every time. At a certain point there won't be any soil left and this is when you've finished converting your Begonia from soil to Leca.
Thank you for reading this post! I hope it helps you to keep your plants healthy and beautiful! If you're looking for more guides on specific plants, you can always request a plant guide to get a guide for the plant you have trouble with.
Test your plant care knowledge
Quiz completed!
Want to learn more? Sign up for my newsletter to receive free tips in your inbox!
Sign up now!