How to grow a Monstera in Leca
In this guide, we'll go over the process of converting a Monstera Deliciosa planted in soil to planting it in Leca. This process is very similar for any Monstera, so if you don't have a Monstera Deliciosa you can still follow along with the steps.

Growing your plants in Leca is easy and helps you to water your plants properly. If you're unfamiliar with Leca, you should have a look at "What is Leca and why is it useful for plants?" and then come back to this guide.
In this guide, we'll go over the process of converting a Monstera Deliciosa planted in soil to planting it in Leca. This process is very similar for any Monstera, so if you don't have a Monstera Deliciosa you can still follow along with the steps we've outlined in this guide.
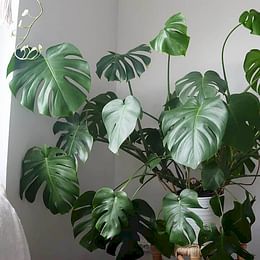
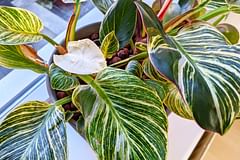
First of, let's meet the plant we're converting from soil to Leca in this post:

It's planted in soil for now, but as you've already seen in the first image of this post, by the end it'll be in Leca.
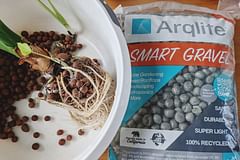
To follow along with this guide, these are the things you'll need:
- Monstera
- Waterproof pot
- Nursery pot
- Leca
- Hydroponics Fertilizer
- Bucket
A link to all of these items can be found at the bottom of this guide.
These are the steps we're going through to migrate the Monstera from soil to Leca:
- Get the Monstera out of the pot
- Clean the soil off the Monstera roots
- Clean your pots
- Clean your Leca
- Fill the nursery pot with a base layer of Leca
- Plant the Monstera in the Leca
- Water the Monstera planted in Leca
You can click these links to navigate straight to that section. Let's get into it and migrate this Monstera to Leca.
1. Get the monstera out of the pot
Back to top
 Monstera out of the nursery pot
The first step is to remove your Monstera from the nursery pot it came in. Now we can see the healthy roots on the plant and we can see how much soil we'll need to remove from the roots.
Monstera out of the nursery pot
The first step is to remove your Monstera from the nursery pot it came in. Now we can see the healthy roots on the plant and we can see how much soil we'll need to remove from the roots.
2. Clean the soil off the Monstera roots
Back to top We can now start to clean the soil off the roots of your Monstera. This process could take a while and will involve several phases, so reserve a little bit of time for this process. To get started, clean the soil off the roots with your hands. Be careful not to damage the roots of your Monstera. The best way to minimize the damage is to take your time and do this process slowly.

When you've reached a certain point in the process where your roots look a little like the image above, it might be very difficult to remove more soil with your hands. Luckily there is a trick to remove more soil from the roots of your Monstera: water.
To get started with this, get a bucket that you're not afraid to get dirty, because this is quite a dirty process. Fill the bucket with water at room temperature like below.

Now you can carefully clean the roots inside of the water and you'll see that you're able to remove a lot more soil this way. After cleaning for a few minutes your water will very dirty like the image below.

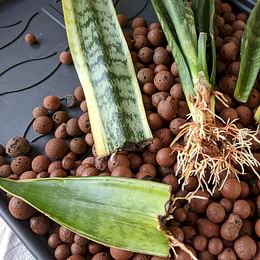
You might have to refresh your water a few times, depending on how much dirt you still have on the roots. When your roots are mostly clean, or at least approaching the roots like in the image below, you're done cleaning the roots at this point.

It's impossible to clean the roots completely at this point and that's okay. Cleaning the roots is a continuous process for the first few weeks your plant is in Leca.
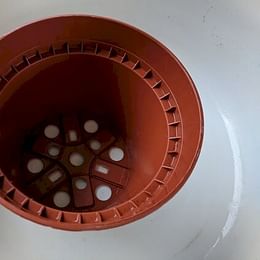
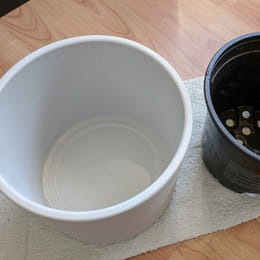
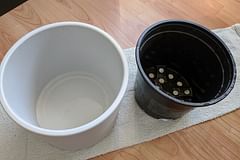
3. Clean your pots
Back to top Now that your plant is clean, it's ready to be planted in Leca. Before we do this, we'll need to clean the pot we're using for this process. The goal is to leave no dirt behind and get the pot as clean as possible. This reduces the risk of pests significantly.
4. Clean your Leca
Back to top Before we can plant the Monstera in Leca, we'll need to clean all the dust off the clay balls. If you're using Leca that you've already washed before, you can skip to the next step. If the Leca you're going to use for this project hasn't been used before, there will be a lot of dust on the clay balls. Cleaning them is very important. To do this, get a bucket and get enough clay balls to fill your pot up until about 2.5 cm (1 inch) from the top.
Now that one bucket is filled with the Leca, get a second bucket that's clean and empty. First, fill the bucket with the Leca with water and wash the clay balls thoroughly. When they're clean, move them into the second bucket, leaving the dirty water in the bucket you used to clean the clay balls. Throw the dirty water away and repeat the process until the leftover water is (almost) clean. This could be 4-5 cycles. Afterward, you have clean Leca and you're ready to plant the Monstera in your pots and Leca.
5. Fill the nursery pot with a base layer of Leca
Back to top Now that your Leca is clean, we can start to fill the nursery with a base layer of Leca. This base layer is here to make sure the roots of your Monstera aren't sitting in water at all times. If your roots are sitting in water all the time, the risk of root rot is quite high. The base layer of Leca protects your plant from this. Fill the nursery pot with about 2.5 cm (1 inch) of Leca like the image below.

With this base layer, you're ready to plant your Monstera in Leca and you're reducing the risk of root rot on your plant.
6. Plant the Monstera in the Leca
Back to top Now you can plant your Monstera on the base layer in the nursery pot. You can do this in any way you want. Just make sure you cover all the roots by Leca, so they're not exposed to light. You can rearrange your plants to your liking and fill the Leca intil the top like the image below.

Your plant should be able to stay in the position you chose for it. If this is not the case, you might need a bigger pot or you can use a stick or moss pole to support your Monstera.
7. Water the Monstera planted in Leca
Back to top Now the most important part of taking care of your Monstera planted in Leca: watering your plant. When you're watering your Monstera in Leca, it's important to include hydroponics fertilizer in the water. Leca doesn't contain any nutrients by itself, so adding this to the water is important. When you're watering your plant, make sure you don't add water to the waterproof pot past the base layer we've created earlier. This makes sure the plant is never sitting in the water and the Leca will regulate the water in the pot for you.
The conversion process is now complete, but there is more maintenance to do over the next few weeks. Every time you're getting ready to water your Monstera, you'll need to pull your plants out of the Leca, clean their roots, and clean the Leca. There will still be soil left behind on the roots and if you don't remove this, it could cause problems later on. Usually it's 2-3 times, after which the roots should be soil free and you won't have to pull your plants out any more. From here on out you'll only have to water your plant and it'll stay clean.
Conclusion
In this guide, we've converted a Monstera planted in soil to Leca. We've got it out of the pot, cleaned its roots, prepared the pots and Leca for use, and planted the Monstera in Leca. The process takes a little bit of time, but after it's done, your plant won't need as much maintenance as it would with soil. Just water your plant when the Leca is no longer able to absorb the water in the waterproof pot and that's it. You'll have helped to reduce the risk of pests on your Monstera significantly by converting it to Leca. Now you also have the option to pull out your plants to check on their roots without the soil in the way if you so choose.
Thank you for reading this post! I hope it helps you to keep your plants healthy and beautiful! If you're looking for more guides on specific plants, you can always request a plant guide to get a guide for the plant you have trouble with.
Test your plant care knowledge
Quiz completed!
Want to learn more? Sign up for my newsletter to receive free tips in your inbox!
Sign up now!