How to care for a spider plant
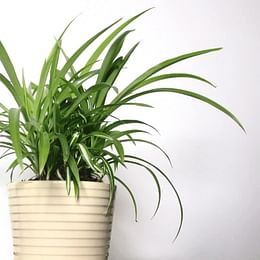
The spider plant is probably one of the easiest plants to take care of. In this post, we'll go over everything you need to know to take care of the spider plant and a few things you need to be mindful of when you're taking care of one of these plants. They're great for beginners and will show you great results very quickly.

Have you been looking for an easy-to-care-for plant that doesn't mind being watered every few days? The spider plant might be the plant for you! The spider plant is one of the easier plants to care for. When you consistently take great care of the spider plant, it will reward you with explosive growth and many baby plants to propagate. The spider plant is a plant-growing factory when it's happy!
In this guide, we'll go over several important topics to remember when taking care of a spider plant. It's an easy plant, but it has some difficulties you should know about. At the end of the post, I'll show you a few varieties of spider plants, so you know what to expect when buying or growing this plant.
In this guide, we'll go over these topics relating to taking care of a spider plant:
Let's get right into this post, so you can grow a beautiful spider plant yourself!
Watering your spider plant
Spider plants are thirsty plants and are forgiving when you accidentally overwater them. In general, you should water your spider plants about once a week. Before watering, check the soil to see if it's dry. If it's still moist, wait another day or two and repeat this until the soil is dry. The plant might be thirsty, but it does like the top of the soil to dry out.
It's important to check the soil to avoid overwatering your spider plant. Overwatering it once is not a problem, the spider plant recovers very quickly, but doing this consistently will kill it. By checking the soil's moisture levels, you ensure not to give your plant too much and risk overwatering it.
There is a straightforward sentence to remember when watering your spider plant: let it dry out a little and then water generously.
Symptoms of overwatering your spider plant
If you've accidentally watered your spider plant too much, the plant will tell you quickly. Your spider plant will show a few symptoms, these symptoms of overwatering are quite simple: the leaves will start to turn yellow and brown and die slowly. If you see this happening, stop watering, let the soil dry out, and only then water again. The plant should pick up where it left off within a few days. It usually recovers quickly.
Be sure to trim any dead or dying foliage, because this helps to give some energy back to the plant to grow new leaves. Removing dead foliage also helps to keep pests away from your plant.
Check for root rot
It's also a good idea to check the roots for any root rot. You can do this by lifting the plant out of the pot or simply smelling the soil. If it smells a little funky, your plant is probably dealing with root rot. If this is the case, make sure to trim any rotting roots to prevent spreading it to healthy roots. After trimming the roots, repot your plant in fresh soil.
Symptoms of underwatering your spider plant
When you let the soil dry out, make sure the plant doesn't go too many days without water. When your spider plant doesn't get enough water, its leaves will start to fade to a lighter color. Normally, the leaves are a deep green, but when your plant doesn't get enough water, its leaves will get lighter. This makes it very easy to spot if your plant needs some water.
Another symptom of underwatering is that the leaves of your spider plant will start to fold up along the length of the leaf. If the plant has been dry for too long, the tips will become brown and crispy.
When you see this, it's time to water your plant again. If you've recently watered your plant, within a day or 2, make sure to wait a few more days for the soil to dry out and to see if your plant unfolds its leaves again. It's better to wait a day more than to overwater your plant.
The best sunlight exposure for a spider plant
Another very important aspect of taking care of a spider plant is proper sunlight exposure. Spider plants need indirect sunlight to be happy and grow properly. If you give it too much sunlight the beautiful white streaks on the leaves will fade to green. If you give it too little sunlight, the leaves will turn yellow and will start to drop.
You can place your spider plant in any room that gets some sunlight, but it shouldn't be placed in the full afternoon sun. An ideal place is somewhat close to a northern-facing window (southern-facing in the southern hemisphere). This is where the plant gets some (weaker) sunlight and it won't get too much.

Spider plant in a room with a southern-facing window
If you do want to place your plant in a room with a southern-facing (northern-facing for the southern hemisphere) window, make sure it's not close to the window. You know it's too close to the window when the leaves start to fade to light green. When you notice this, move it to a darker place and the plant should recover quite quickly.
The ideal temperature and humidity ranges for a spider plant
Spider plants do best in daytime temperatures ranging from 18 to 24 degrees Celsius (65 to 75 F) and nighttime temperatures from 13 to 18 degrees Celsius (55 to 65 F). They prefer a relative humidity level between 40% and 60%.
To maintain these conditions, avoid placing the plant near drafts, heating vents, or air conditioning units, and consider using a humidifier or misting the leaves regularly to ensure adequate humidity, especially in dry climates or during winter.
What are the typical signs that my spider plant needs more humidity?
Typical signs that your spider plant needs more humidity include browning or crispy leaf tips, leaves that appear wilted or droopy even after giving it enough water, and a general "tired" appearance. You might also notice the plant is not producing as many offshoots or "spiderettes" as usual. Consistent humidity levels can help to solve these problems.
Choosing the right soil for your spider plant
Spider plants are thirsty plants, but can't sit in wet soil for too long. Because of this, it's important to use well-draining soil, Leca, or a combination of soil and Leca. The goal is to water the plant a lot, let the soil absorb all the water it can hold onto, and let any excess water drain away from a drainage hole. This way your spider plant will be perfectly watered every time.
The right type of soil for a spider plant should be a mix of 2/3 potting soil and 1/3 perlite. This combination gives the soil some structure, which means that it won't compact too much over time. This structure helps to keep the soil light and airy. The perlite helps to drain the excess water from the pot quickly, so it doesn't stay behind in the pot to potentially cause root rot.
For using Leca, check out this guide: What is Leca and why is it useful for plants?.
Fertilizing a spider plant
The spider plant is a very quickly growing plant, so you'd expect it to need to be fertilized a lot. This is not true. The spider plant doesn't need to be fertilized very often to grow, but if you fertilize it regularly, it will give you small white flowers, like in the photo below.

White flowers on a spider plant
When you choose to fertilize your spider plant regularly, do this once at the beginning of spring and once at the beginning of summer. Make sure to stop fertilizing in the autumn and winter, as this is the dormancy period for the spider plant.
During the dormancy period, the spider plant won't use any of the fertilizer, so this will stay behind in the pot if you happen to fertilize your plant in the fall or winter. This is not a problem if it happens once or twice, but this fertilizer will build up over time and can harm your plant's roots, causing rootburn.
Ideally, use a balanced, water-soluble fertilizer. This type of fertilizer makes it easier to fertilize your plant correctly. The water-soluble fertilizer can be mixed in with the water you normally use for watering your spider plant.
Pruning a spider plant

Taking care of your spider plant by grooming and pruning it is key to keeping it healthy and looking good. Regular pruning helps you shape the plant, encourage new growth, and get rid of any damaged or dead leaves. This also stops the spider plant from getting too leggy or overcrowded, so it stays vibrant and full.
When to prune your spider plant
The best time to prune your spider plant is during the growing season (spring and summer). This way, the plant can bounce back quickly and focus its energy on growing healthy new leaves. However, feel free to trim off any dead or discolored leaves whenever you need to throughout the year.
Tools you will need
To prune your spider plant effectively, grab a pair of sharp, clean pruning shears or scissors. Clean tools help avoid spreading diseases and ensure precise cuts. It's also handy to have a small container or bag to collect the trimmed leaves.
The steps on how to prune
Inspect the plant
Start by taking a good look at your spider plant. Check for any leaves that are brown, yellow, or just don't look healthy.
Remove damaged leaves
Cut the damaged leaves right at the base of the plant, just above the soil. Make sure your cuts are clean and straight to avoid hurting the healthy parts. If the leaf tips are browning from low humidity or water quality issues, trim them neatly. Snip just above the healthy green part, following the leaf's natural shape.
Trim leggy growth
If your spider plant is getting too big or leggy, just trim the longer stems to keep it looking more compact. Snip right above a leaf node to encourage new growth from there.
Remove spiderettes
Spider plants grow offshoots called spiderettes or plantlets. To keep the plant's size in check or promote fuller growth, just trim these runners back to the base. If you're looking to propagate, leave some runners intact so the spiderettes can root.
Clean up
Gather all the trimmed foliage and dispose of it properly. Check around the base of the plant and the soil for any fallen leaves or debris, as this can attract pests or promote fungal growth.
Dust can build up on the leaves over time. Wipe them with a damp cloth to keep them clean and help with better photosynthesis.
Best practices
Always use clean and disinfected tools to prevent pests or diseases. Don't overdo it with pruning; just take off what's needed to keep the plant healthy and looking good. Regularly groom and prune your spider plant to keep it in top shape.
Repotting your spider plant

Repotting a spider plant is a key part of keeping it healthy and happy. The process is simple and ensures a smooth transition so your plant can keep thriving. Here's a step-by-step guide on how to repot a spider plant:
Steps to repot a spider plant
Repotting a spider plant is straightforward.
Prepare the new pot
Pick a pot with drainage holes to avoid waterlogging. Add a layer of around 2 cm (1 inch) of fresh potting soil to the bottom of the new pot.
Remove the plant from its current pot
Gently flip the pot upside down while holding the base of the plant. Tap the bottom or squeeze the sides to loosen the roots. Carefully slide the plant out without harming the roots.
Inspect and trim the roots
Check the roots for any signs of rot or damage. Trim off any dead or overly long roots with sterilized scissors or pruning shears. If the plant is really root-bound, gently untangle and spread out the roots.
Place the plant in the new pot
Place the spider plant in the middle of the new pot. Add soil around the roots, filling in the gaps, and make sure the plant stays at the same soil level as before.
Settle the soil
Gently press the soil to get rid of air pockets, but don't compact it too much. Make sure the plant stays stable and upright.
Water thoroughly
Water the newly potted plant until it starts draining from the bottom. This helps settle the soil and makes sure the roots get good contact with the new potting mix.
Adjust and care
Put the repotted plant in a spot with the right amount of light. Get back to your usual care routine, like watering and feeding, as needed.
How often should I repot my spider plant?
You should usually repot your spider plant every year or two. Look for signs like roots poking out of the drainage holes, the plant getting root-bound (when roots are tightly packed and circling the pot), or a noticeable slowdown in growth. Spring is generally the best time for repotting, as it lets the plant settle into its new pot during the growing season.
The best pot to use for your spider plant
The best pot you can use when growing your spider plant is a pot with a drainage hole in the bottom. This way, the excess water can escape. This helps a lot to avoid overwatering your spider plant. Another great idea is to use a terracotta pot because this is a breathable material and helps to get oxygen to your plant's roots. The terracotta pot also helps to evaporate the moisture in the pot more quickly, reducing the risk of overwatering even more.
If you're choosing a pot for your new plant, or you're choosing a pot for repotting this plant, it's important to choose a pot that's about 1 size larger than what it's currently growing into. The spider plant loves to be rootbound.
Another reason to choose a pot that's only 1 size larger than the current pot is that choosing a pot that's too large can put your plant at risk of overwatering. The soil will stay moist for longer because the spider plant isn't big enough to absorb the moisture from the pot. If it stays moist for too long, this could cause the soil to rot.
Growing spider plants outdoors

Spider plants can be grown outdoors, but it really depends on where you live and the local climate. They prefer warm, temperate areas and do best in USDA hardiness zones 9-11. If you live in a cooler climate, you'll need to bring your spider plants inside before the first frost to keep them safe from the cold.
Spider plants thrive in bright, indirect sunlight. Direct sun can scorch their leaves, so aim for a spot with partial shade. Outdoors, they do best in temperatures between 13 to 24 degrees Celsius (55 to 75 F). Just be sure to keep them away from temperatures below 10 degrees Celsius (50 F) or above 32 Celsius (90 F) for too long.
If you want to plant your spider plant outdoors permanently, go for well-draining soil, like a mix of potting soil with sand or perlite. Make sure the soil is rich in organic matter to keep it growing healthy. When putting spider plants in the ground, space them about 12-18 inches apart to give them room to grow and for good air circulation.
Common Pests and Treatments
Even though spider plants are pretty easy to care for, they can still fall victim to pests. These plants can be affected by common bugs like spider mites, aphids, mealybugs, and scale insects. You'll need specific treatments to handle each type of pest effectively.
Spider mites
If you notice fine webbing on your plant and yellowing or stippling of leaves, these could be symptoms. To deal with this, start by isolating the affected plant to keep it from spreading. Next, use a strong stream of water to knock the mites off the leaves. Then, apply insecticidal soap or neem oil to both sides of the leaves as per the product's instructions. Also, try increasing the humidity around your plant since spider mites love dry conditions. For more details, check out How to get rid of spider mites on your houseplants.
Aphids
If you've noticed sticky residue (honeydew) on your leaves or distorted, curled new growth, you might be dealing with aphids. You can deal with this by spraying your plants with water to knock them off. Alternatively, try using insecticidal soap or neem oil to cover all the aphids. Another great option is to introduce beneficial insects like ladybugs that naturally prey on aphids. For more tips, check out this helpful article: How to get rid of aphids on houseplants.
Mealybugs
If you notice white, cottony masses on your plant's leaves and stems and see stunted growth, you've likely got mealybugs. Luckily, there are a few ways to tackle them!
First, you can dab the mealybugs with a cotton swab dipped in rubbing alcohol. If you need a bit more firepower, try using insecticidal soap or neem oil on the affected areas. Just remember to repeat the treatments every few days until you've got the infestation under control. For more detailed steps, check out this guide: How to get rid of mealybugs on houseplants.
Scale insects
If you notice brown, shell-like bumps on your plant's stems and leaves along with a sticky residue, you've got scale insects. Here's how to deal with them: First, try scraping them off with a soft brush or cloth. If that doesn't do the trick, dip a cotton swab in rubbing alcohol and wipe it away.
For a more thorough approach, treat your plant with insecticidal soap or neem oil, making sure to cover it well. For more detailed info, check out this article: How to get rid of scale insects on houseplants.
Preventing pests on your spider plant
To keep your plants healthy and pest-free, make sure to check them regularly for any signs of pests. Keep their growing area clean and free from plant debris, and always quarantine new plants for a few weeks before adding them to your collection to avoid infestations.
Lastly, give your plants the proper care they need by maintaining the right light, water, and humidity levels, keeping them strong and more resistant to pests.
Are spider plants safe for pets?
Spider plants are generally considered non-toxic and safe for pets, including cats and dogs. This means they do not contain harmful substances that could cause serious poisoning if ingested. Even though they're non-toxic, eating a lot of spider plant leaves can still cause mild stomach issues in pets, like vomiting or diarrhea.
Because of this, it's a good idea to place your plant outside of pets' reach when they tend to chew on your plants.
The different varieties of spider plants
As you can see in the image at the top, the spider plant is completely green, but there is also one that has a white and green striped pattern, like the picture below. The picture at the top is a result of taking good care of little sprouts and helping them grow. The spider plant below was actually the first spider plant I owned. Since buying it, it's more than doubled in size. Hopefully, it's going to grow shoots and baby plants soon!

The edges of the leaf of the plant above are lined with white stripes. There is also a variety of spider plants that have leaves with green edges and white centers, to see this, have a look at a few of the smaller leaves at the bottom of the spider plant in the picture at the top. I care for all of these varieties in the same way, they all get the same amount of sunlight and water.
Conclusion
I hope this post helps you to care for your spider plants. Hopefully, you can keep these plants healthy and thriving to such an extent that you get little spider plant sprouts. When you do, have a look at "How to propagate a spider plant" and I'll explain exactly what you can do to get more of these beautiful plants.
If you want to see this process in action (through photos), you can have a look at "How to care for a spider plant" (photos).
Share this plant care guide with your friends, family, or even colleagues to help them on their way to taking excellent care of their plants!
Thank you for reading this post! I hope it helps you to keep your plants healthy and beautiful! If you're looking for more guides on specific plants, you can always request a plant guide to get a guide for the plant you have trouble with.
Test your plant care knowledge
Quiz completed!
Want to learn more? Sign up for my newsletter to receive free tips in your inbox!
Sign up now!