Reviving a neglected plant: Pruning & Propagation tips for plant parents!
In this video, join me as I tackle the challenge of rescuing a neglected houseplant that I forgot to water! 🌱 I’ll show you the signs of distress to look for, how to trim yellow and brown leaves, and the importance of using sanitized tools to prevent disease.
Watch as I demonstrate the step-by-step process of caring for your plant, including pruning techniques to encourage new growth. Plus, learn how to propagate your cuttings and select the right media for rooting, whether it's water or LECA.
Whether you’re a seasoned plant parent or just starting out, you’ll find valuable tips to keep your plants healthy and thriving. Don't forget to subscribe for more plant care tutorials and updates!
Key topics covered
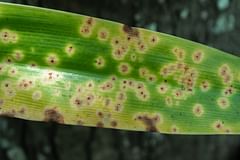
- Signs your plant needs help
- How to properly prune your plant
- Caring for cuttings: Water vs. LECA
- Important tips to prevent plant diseases
Thank you for watching, and let’s get those plants back to life! 🌿
Transcript
| Time | Script |
|---|---|
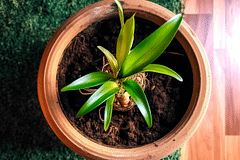
| 0:00 | So I was walking around my house and I discovered I forgot to water one of my plants. |
| 0:07 | So you know what? I thought why not set up the camera and show you what I do in this case? |
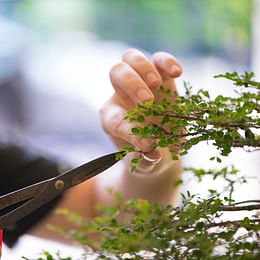
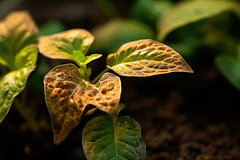
| 0:12 | You can see yellow and even brown leaves, so we're going to have to trim a little bit. |
| 0:20 | I'll show you what to trim and what to look for to make this plant look good again. |
| 0:26 | So, what we'll need is this pruning shear. |
| 0:34 | But before we use that, I’ll have to clean it with some alcohol. |
| 0:40 | We do this to make sure that we don’t spread any disease from one plant to another. |
| 0:46 | So let’s grab a little paper towel and clean the tool. Here we go! |
| 0:59 | Now this tool is clean and we can use it. |
| 1:03 | We know for sure that it won't spread disease from this plant to another plant or maybe from another plant to this plant. |
| 1:08 | We want to do this any time we switch from one plant to the next. So that's clean. |
| 1:14 | Let's look for this leaf here. You can see that this is yellow. |
| 1:21 | I'll move this aside and you can see where it goes – all the way up here. |
| 1:25 | We want to cut it right up at the base, here. Let me try to show you a little bit closer. |
| 1:30 | So we want to cut it off right here, right where it connects to the stem. |
| 1:37 | Alright, so we've decided we're going to cut it right at the stem, right up here. |
| 1:42 | Grab the scissors and cut it right off as close to the stem as possible. |
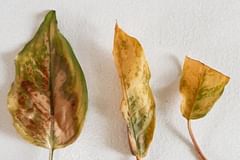
| 1:48 | There you go! Some will just fall off right away because they’re that dry. |
| 2:01 | These are the dry brown ones because they completely dried out. |
| 2:06 | I forgot to water it for a week or so, and it’s in the middle of summer in a hot room, so all the moisture will evaporate quite quickly. |
| 2:15 | Alright, so there are a few more obvious candidates like this yellow one and this yellow one back here, so I’ll cut those off. |
| 2:24 | Just make sure to go as close to the base of the leaf as you can. |
| 2:28 | I’ll try to go as close to the stem here. |
| 2:34 | So, let’s pull this out. |
| 2:39 | Alright, now that we have cut off the most yellow and brown leaves, you will also see some of these yellowed ones that are not completely yellow. |
| 2:49 | Most of these leaves, they won’t turn back to green, so we can also trim these off. |
| 2:57 | Just go around to look for any of these and remember to cut them off as close to the stem as you can. |
| 3:12 | Also, some of these are mostly green still, but the edges are yellow, so just cut them off. |
| 3:16 | It will encourage new growth anyway, so get rid of all the leaves that don’t look too good. |
| 3:25 | As you can see, this plant has a really obvious front and back because it's in a corner room. |
| 3:30 | It always faces the light; however, for some plants, you would recommend rotating them. |
| 3:37 | For this plant, I don't recommend it because if you do, you will get really weird growth. |
| 3:56 | So I found an example of what would happen if you rotate this too much. |
| 4:02 | Here you've got a vine that hasn’t been trimmed, so you can see this is really long. |
| 4:12 | If you were to keep this on the plant, you can see it has growth in really strange directions. |
| 4:25 | That's what your whole plant will look like—disorganized and kind of weird. |
| 4:32 | While we have this plant here and while we're trimming, I also want to trim this because you can propagate those. |
| 4:40 | So I can show you what this looks like from close up. |
| 4:44 | You can see a really long vine. |
| 4:48 | This is my fantastic permanent filming setup! (Haha) |
| 4:56 | Here we go! Let's connect it to the plant. |
| 5:03 | It's a little difficult to show you, but here we go. |
| 5:08 | We want to cut it off right here, ideally under a node. |
| 5:14 | This is a node right here; it’s a bit thicker than the rest and new leaves will come out from it. |
| 5:21 | You can see little air roots coming out of there; we want to cut under that because those will turn into new roots. |
| 5:28 | Let’s grab your scissors and cut it off right under the node. |
| 5:38 | Okay, so we've cut it off. You can see right here. |
| 5:43 | It’s a bit difficult to focus, but you can see the node—this is a bit thicker than the rest of the stem. |
| 5:50 | You can see very small air roots with little brown dots coming out. |
| 6:09 | If we go down, you see this plant has quite a few of them. |
| 6:24 | This cutting is pretty long; we can probably cut this into at least five or six different cuttings. |
| 6:32 | Make sure at least every cutting has two leaves because the leaves are needed for photosynthesis. |
| 6:43 | So, again we’ll cut it right under a node. |
| 6:47 | You can see this one has three leaves, so we'll cut it right here. |
| 6:57 | We got one, two, three leaves on this cutting! |
| 7:02 | I’ll cut right there. |
| 7:07 | One, two, three leaves on this cutting! I’ll cut right there. |
| 7:19 | And then, since this one barely has any leaves, just this one here, I'm going to try to propagate it. |
| 7:27 | However, I don’t think it will work because it is quite a big cutting, but it doesn’t have many leaves. |
| 7:36 | Alright, let's see how well we get on this small space. |
| 7:40 | Now that we've cut them all up, I've got all the cuttings right here, we’re going to pot them. |
| 7:45 | I don't like to do this in soil because it can grow diseases quickly. |
| 7:52 | So, I prefer to do it in water or choose a bit of LECA. |
| 7:55 | Here I've got a really small pot; this tiny one is just there to ensure that roots will grow. |
| 8:01 | You can repot them as soon as possible. |
| 8:04 | I took a few out to make it easier to check how much water is at the top because it's a bit difficult with no drainage hole. |
| 8:18 | So, that's how I do it. I stick a little stick down there to see how much water is left. |
| 8:24 | We've got the cutting. We've got the pot. Let's put it in there somewhere. |
| 8:28 | You might want to keep it at the edges here. |
| 8:36 | And because we have quite a few, I'm going to have to balance it, so it’s going to be a bit difficult to film. |
| 8:40 | Here’s another one; this one has a big air root. |
| 8:44 | And here’s another one. |
| 8:47 | Alright, this one will just be at the edge here. |
| 8:57 | So let’s put it down for a little bit. |
| 9:03 | If I let go, they will fall out because they're not anchored down. |
| 9:07 | I’m going to put some of the LECA around the roots right now to see if this works. |
| 9:13 | Let’s grab a few pebbles. |
| 9:52 | Now they are anchored down a little bit, and now you can let go. See? They’re not going anywhere. |
| 9:59 | Now you want to give them some water. |
| 10:02 | For watering, I'd like to use water, obviously, but we're adding some hydroponics fertilizer to it. |
| 10:08 | This is important because the LECA in here doesn’t have any nutrients, and soil does. |
| 10:13 | That’s why you can use different types of fertilizers when you use soil. |
| 10:16 | Since we’re not using any soil, we’re going to have to use this special type of fertilizer. |
| 10:22 | In this case, I have to add one milliliter for every liter. |
| 10:26 | My container is three liters, so I’m going to add three milliliters. |
| 10:32 | Usually, the little things have lines on them; you can see subtly see them in there. |
| 10:40 | Each of them is a milliliter, so it's easy to measure. |
| 10:44 | I’m going to mix that. |
| 10:46 | I couldn’t use my three-liter container, so I used an old fertilizer bottle that’s no longer in use. |
| 10:56 | I just added some of the hydroponic fertilizer; this is about half a liter. |
| 11:00 | So, half a liter of water and half a milliliter of the fertilizer mix. |
| 11:05 | Now we can add it to the LECA in the little pot. |
| 11:11 | I added some water, but it's spilling everywhere; that’s okay. |
| 11:18 | It’s in there, not all the way full obviously; you don’t want to drown the plant. |
| 11:20 | Just enough in there so the plant can have some water, but not drowning. |
| 11:33 | This is all good to go now. |
| 11:36 | That took a lot of effort! It’s so warm in here, but it’s done! |
| 11:41 | I potted up the thing and it has some water; now all that’s left to do is to clean this again. |
| 11:47 | We want to use the same alcohol. I already did that, but you want to do that when you switch to new plants as well, just to be safe. |
| 11:56 | Every time you put it away and anytime you pick it back up, just clean it. |
| 12:00 | You can spread diseases really easily, so it’s really not worth the risk to not do it. |
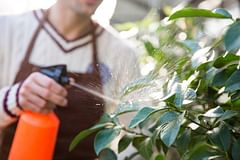
| 12:07 | Now the plant looks really nice again, and it’s a good idea to water it instead of forgetting it. |
| 12:14 | Otherwise, that will happen again! By watering frequently (at least once per week in the summer), you will encourage the plant to grow more. |
| 12:25 | The pruning we did actually promotes growth because now it doesn’t have to take care of those sick leaves anymore. |
| 12:32 | It can grow new leaves that will pick up the light again, causing photosynthesis and feeding the plant again. |
| 12:39 | So, pruning is a good thing for sure, but also, don’t forget to water your plant! |
| 12:46 | Thank you for watching! This is something new I’m trying to do. I’m not very good at videos; I've been writing a lot about plants, but video is very new to me. |
| 12:54 | I hope you enjoy this! |
Thank you for reading this post! I hope it helps you to keep your plants healthy and beautiful! If you're looking for more guides on specific plants, you can always request a plant guide to get a guide for the plant you have trouble with.
Test your plant care knowledge
Quiz completed!
Want to learn more? Sign up for my newsletter to receive free tips in your inbox!
Sign up now!